
Just thought I'd share a little project my daughter and I have been working on for Mother's Day. Why not have a go with your little one?
To make this card you will need:
- 1 Square card blank or card to make your own
- 2 Sheets of pretty patterned paper
- 1 Sheet plain white card
- Coloured tissue paper
- Double sided tape
- Scissors
- Pen
- PVA child safe glue.
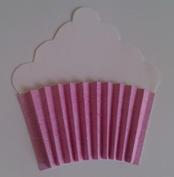
- Draw and cut out a simple cupcake shape from the white card using the card blank as a guide to size.
- Back the card blank with one of the patterned papers, saving the rest of the sheet for later.
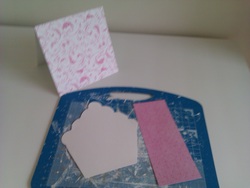
- Using the second sheet of patterned paper cut a long strip the depth of the cupcake bas but longer than the card. Carefully fold the strip repeatedly until you have a concertina like strip leaving both edges with a narrow flat strip to attach it by.
- Use a thin strip of double sided tape to attach the ends of the concertina to the cupcake shape, trimming the bottom where a curve will have been created.
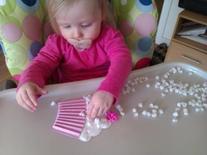
- Take the tissue paper and cut or tear into roughly even sized squares. Your little one can then help to scrunch each square up into a little ball.
- Cover the top portion of the cupcake in PVA and with your child cover the area with the tissue paper balls. It's a good idea to start with the cherry so you can keep it's shape better.
- When dry use some of the white card to write or print your greeting (We wrote Nanny for Mother's Day but it could easily work for a birthday card or similar).
- Trim the greeting to a good size and back onto the peice of patterned paper you saved earlier. Trim again so the backing is slightly larger than the greeting and attach to the front of the card using a good dollop of PVA. Allow to dry then fix the cupcake to the card blank and you are all finished!

I'd love to know what you think of this idea and whether you tried it out at home! Would you like to see more "Makes" in the blog?
 RSS Feed